
At first glance, Sitecore installations from version 9 onwards seemed unnecessarily complicated. I myself worked through a number of failed installations the first few times. Then tools like SIF-less were created to simplify the entire process, but I always preferred to install Sitecore myself.
As a result, I’ve compiled the key steps I follow for a quick and easy installation from scratch for Sitecore 9.1 Initial Release.
Pre-Requisite Steps:
- Install Java JRE (Version 1.8+)
- Once installed, set the JAVA_Home environment variable
- Install Solr 7.2.1
- I recommend unzipping the downloaded Solr to C:\Solr-7.2.1
- Setup SOLR to run as a service with NSSM
- NSSM makes our lives extremely easy here. Simply download NSSM, start a command prompt as an administrator, and run
NSSM.exe install solr721. This will open up a simple dialog box for the service settings. If you followed the earlier step, the Path field should point toC:\Solr-7.2.1\bin\solr.cmd. The startup directory will be automatically filled, and the arguments should bestart -f -p 8983. The arguments are very important, specifically the-fflag, as I have heard stories of Solr not working correctly otherwise and days lost to debugging.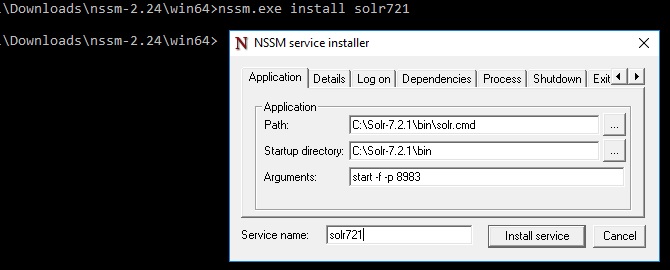
- NSSM makes our lives extremely easy here. Simply download NSSM, start a command prompt as an administrator, and run
- Enable SSL for Solr
- This is one time where it’s just not worth the trouble to complete all the steps yourself. Save yourself the time and use the scripts graciously supplied by Kam Figy here.
- Note: I’ve found that sometimes the script complains about not finding the keygen.exe. In that case, I just edit the exe path directly into the script and it works no problem.
- Also note: You will probably need to restart the Solr service after executing this script before you can confirm it’s working correctly with SSL.
- Enable Contained Database Authentication
- This is simple, just login to your target SQL database server and fire off the following lines:
    sp_configure 'contained database authentication', 1;
    GO
    RECONFIGURE;
    GO
    EXEC sp_configure 'contained', 1;
    RECONFIGURE;
- Setup SQL Admin User
- Easy to forget sometimes, but make sure you have an admin user to use for the sitecore install. You may have to enable mixed authentication for SQL, and test to make sure you can login to the database server with that user.
- Install SIF
- First, you’ll want to register the repository:
Register-PSRepository -Name SitecoreGallery -SourceLocation https://sitecore.myget.org/F/sc-powershell/api/v2
- Next, you’ll want to install SIF itself (Already have an older version of SIF installed? No problem! You will have the option to force the install and run multiple version of SIF side-by-side, in case you have older versions of Sitecore 9 as well. By default, the latest version will be used, and you can run a specific version when needed with the -RequiredVersion flag)
Install-Module SitecoreInstallFramework
- Alternatively, if you have an older version installed, you can simply run the update command.
Update-Module SitecoreInstallFramework
Great! The most elusive pre-requisites are all done now. This is assuming you have the basic requirements such as SQL/SSMS, Powershell, .Net Framework 4.7.1, etc…
Main Installation Steps (Assuming local development installation):
- Download the On Premises deployment packages for XP Single
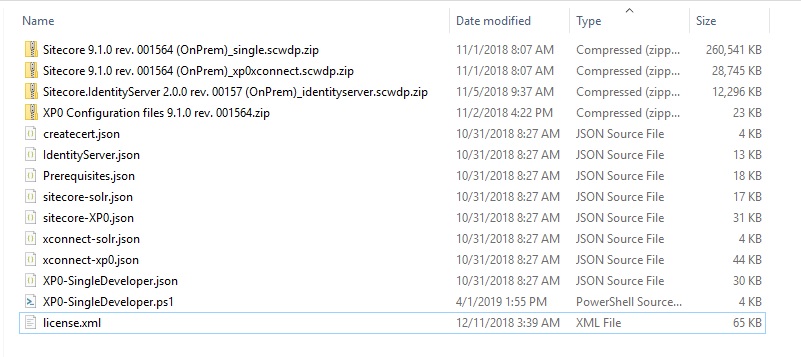
- Unzip the main package into an easy to reference location. Additionally, unzip the configuration files archive into that same folder
- Copy a version of your license.xml file into the previous directory.
- Edit the XP0-SingleDeveloper.ps1 to use all your environment specific variables and file locations. All variables set in this script will be propogated across every other installation file.
- By the end, the installation directory should look similar to the below screenshot:
- Open a powershell command prompt with adminsitrator priviliges.
- First, run
Install-SitecoreConfiguration -Path .\Prerequisites.jsonfrom within the installation directory. Yes, I know this is called pre-requisites, but it’s so late in the process I’d barely call it pre-requisites. - After that is complete, run
.\XP0-SingleDeveloper.ps1from within the installation directory. - Grab a coffee, it can take a while to go through the entire installation script.